Nowadays, anyone can easily install backup cameras on older vehicles using aftermarket parts that are widely accessible. The components of a backup camera are hidden because they are fully integrated into the electronics of new cars. A custom aftermarket setup should also be installed with that in mind.
If you’re even a little handy, backup camera installation is simple and can be done by you. Although every car differs slightly from the next, installing a backup camera is generally a straightforward process. Please read this article carefully if you want to learn how to install a backup camera.
Table of Contents
What Is A Backup Camera?
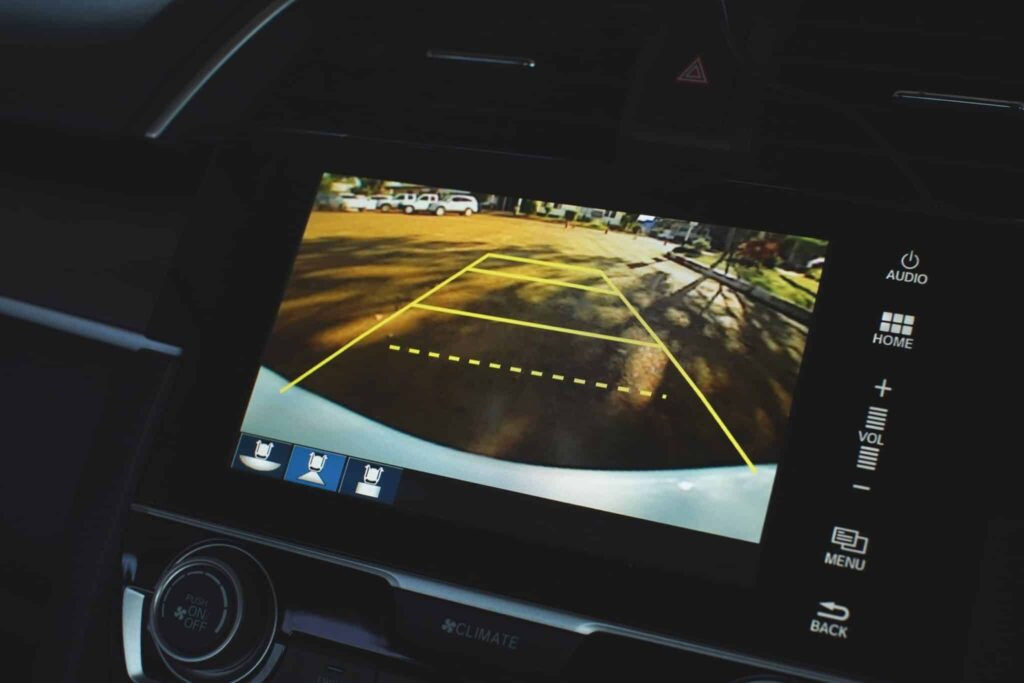
When the car is in reverse, a backup camera, if it was integrated into the systems by the manufacturer, shows a small, live view from behind the car. This helps to prevent Fido from receiving a deep-tissue massage from your tires and gives the driver a better understanding of what is behind him or her.
Following is a list of the various kinds of displays and cameras that are frequently used.
Types Of Cameras
- Bracket-mounted: A bracket that can be mounted on the surface of the car is where the camera is attached but kept separate from it.
- Flush-mounted: a camera that is designed to blend in as much as possible with the vehicle’s surface.
- License plate frame: A license plate frame contains the camera.
- License plate bar: The camera is situated in the middle of a bar that spans across and fastens to the top of a license plate.
- OEM-specific: A specific component, such as a latch handle with a camera built-in for a clean factory look, may be compatible with your more recent used car.
Types Of Displays
- Integrated OEM: a factory component installed inside or on top of the dashboard and included with the vehicle.
- In-dash aftermarket: An added infotainment stereo with a screen that fits flush with the dashboard
- On-dash aftermarket: a standalone display that can be mounted on the dashboard.
- Rearview mirror: The rearview mirror has a monitor integrated into it. The mirror’s screen can be either half or full-length. It just appears to be a mirror when not in use.
- Wired vs. Wireless: To get the video from wired backup cameras to appear on the display, a physical wire connection is necessary. On the other hand, wireless options do not need a wire because they operate using a signal and receiver method.
Choosing Your Equipment
Finding the right equipment may be challenging due to the large price differences and abundance of devices available online. The most common way to mount a rearview camera is with a bracket that comes with it or with the aid of your license plate.
The footage is typically shown on your aftermarket head unit or another screen added to another location. In the second case, kits will come with a screen for your factory mirror or a separate monitor.
Tools You Will Need
Like with most installations, you must collect the components and tools you’ll need. Here are the tools you’ll need to complete the task safely even though the majority of them are probably already in your home.
- Safety Gear: Glasses and Gloves
- Wire Strippers
- Wire Cutters
- Multimeter
- Electrical Tape
- Trim Removal Tool
- Philips or Flathead Screwdriver
- Soldering Iron
- Drill with assorted bits
- Posi-tap or other electrical connectors
- Cable Ties
- Socket Set
- Rearview Camera System
The majority of vehicles, but not all, will be compatible with these tools. You might need Torx or Hex bits to gain access because European vehicles use security bits to prevent tampering from the outside.
Proper Preparation Prevents Poor Performance
Disconnect the battery’s ground cable and make sure the car has no power before performing any maintenance on it. Inaction could result in serious injuries or electrical blackouts. Wear the appropriate safety equipment; the last thing you want to do is endanger yourself or the new equipment you just purchased.
How To Install A Backup Camera?
Mounting The Hardware
To mount the equipment, you must gain access to that area. The dashboard or the rearview mirror are two common simple options. Only if you already have an aftermarket head unit that supports the feature will you not need to install new equipment. The rear part of the head unit would then be reachable.
We will employ a rearview mount system in this instance. Wrap your replacement rearview mirror around your car’s original one using the elastic straps that come with it. Make sure the mirror is unobstructed and continues to function properly.
The camera needs to be mounted to the vehicle next. Using a license plate bracket, which only requires two screws, is the simplest method. Mount it by the trunk handle if you want to keep the OEM look as much as possible for aesthetic reasons. Double-sided tape or drilling into the trunk can be used to accomplish this.
In order to avoid the camera falling off while you’re driving, the double-sided tape must be applied to clean surfaces on both mating surfaces. Any rag and isopropyl alcohol can be used to clean mating surfaces.
In order to route the camera wire inside, you must lastly drill into the trunk. If you want to maintain a tidy appearance, follow these instructions for any kind of camera mount. Although it can be challenging, you simply need to make sure that nothing can be harmed during the process.
You may begin drilling as long as there are no obstructions such as wires. To access the wire inside the car, pass the wire through the hole you just drilled and any potential trim. Although there may be variations in this step, the idea is the same.
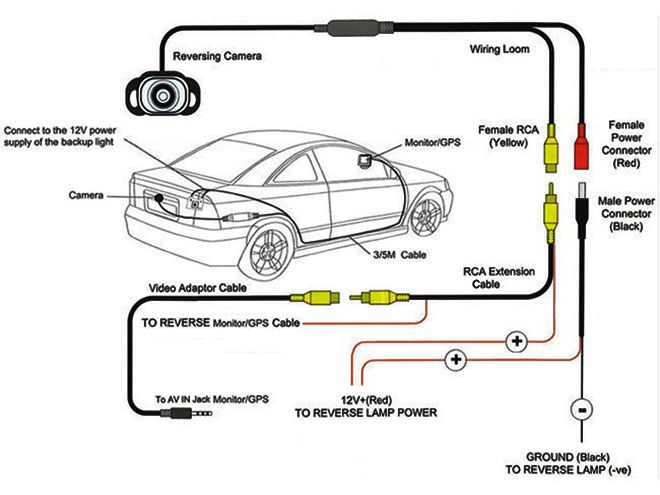
Completing The Wiring
To supply power to the rearview camera, you must find the fuse panel or a switched power terminal. Some vehicles have dedicated posts for this, which make it super convenient, but all cars have fuse boxes. Since you probably want to start your car the next morning, this step is crucial. The rearview camera system will continuously drain your battery overnight if used incorrectly.
Fuses like your wipers or radio only receive power when the key is switched “on”, making them great sources to piggyback off of. A good way to test this is by using a multimeter and checking which fuse terminals receive power when the key is switched “on”.
You must take a fuse tap and insert it into one of the pins of the terminal as shown in the image once you have determined which fuse has switched power. To keep things looking neat, tuck the wires into the required trim as before.
The rearview camera needs to be aware of when the car is in reverse and in need of a video signal in order to function. Running the provided wire from the front to the rear of the vehicle accomplishes this. This step is fairly simple.
The rearview camera then needs to receive a signal. You can accomplish this by using your reverse lights. Finding the wires that run to your reverse light is as simple as disassembling your taillight assembly. Ask a friend to help you depress the brake. It will be simpler to locate the correct wire because this will power the brake light.
Check which wire is receiving 12 volts using your multimeter. The new signal wire needs to be connected to what is already installed on the car. Taping the new wire into the existing one using a Posi-tap or another electrical connector is the simplest method.
To make the process simpler in this situation, use a twist connector. Using a manual wire stripper and soldering in a new wire is an alternative approach.
The rearview camera system ought to be fully functional after completing this step. Connecting the ground cable to the battery post and turning on the device will allow you to check your work. Then, shift into reverse and check the camera’s functionality. You’re prepared to put the car back together and make it look clean again if you can see behind your car.
Check your work again and make sure all the wires are going in the right places if it doesn’t work. Before the cables are hidden behind the trim, it is much simpler to fix the problem. Assure them that there is no interference from the extra cable.
Finishing Touches
You can reassemble the car to make it look brand-new again after making sure the new system functions as intended. It’s time to put back some of the trim pieces you removed.
They usually install without any problems, but because there is another wire running underneath it, they can be annoying. Use zip ties to secure the new wires in place and tuck them behind the interior wires that already exist. You can start driving after the trim has been replaced.